Bond 的概念
网卡bond模式是一种网络绑定或链路聚合技术,它可以将多个物理网卡绑定成一个逻辑网卡,从而提高数据报文的可用性和吞吐量。从这段介绍中,我们其实看出一些使用场景,高可用性是为了解决单点故障,提高吞吐量是为了增加网络带宽。从可用性的角度看,网卡的绑定其实就是将多个网卡看作一个整体,当一张网卡挂掉或者异常之后,其他的网卡可以承载流量请求;从吞吐量的角度看,假如说有机器上有两张 100G的网卡,如果分开,就需要配置两个 ip,通信上不方便,这样我们就可以通过 bond 将其作为一个整体进行使用。变相成为了一张 200G 的网卡
bond的作用
- 提高带宽:通过绑定多个物理网卡,可以实现网络带宽的叠加,从而提高整体网络传输速度。
- 实现冗余:当其中一个物理网卡出现故障时,其他网卡可以接管其工作,确保网络连接的连续性。
- 负载均衡:根据一定的策略将网络流量分配到不同的物理网卡上,实现负载均衡,避免单个网卡过载。
bond模式
bond 的模式一共有七种,每个模式都有各自的特点和适用场景,同时部分 bond 需要交换机的支持,以下是各种模式的概述和优缺点阐述:
| 模式编号 | 模式名称 | 概述 | 优点 | 缺点 |
|---|---|---|---|---|
| mode-0 | balance-rr (轮询负载均衡) | 在所有可用的接口上依次轮询发送数据包 | 最大化带宽利用,提供容错能力 | 可能出现包乱序问题,需交换机支持 |
| mode-1 | active-backup (主备模式) | 只有一个接口处于活动状态,其他接口作为备份 | 高可用性,简单配置 | 无负载均衡,带宽利用率低 |
| mode-2 | balance-xor (XOR 负载均衡) | 根据哈希值决定使用哪个接口,保持会话一致性 | 保持会话一致性,提供冗余 | 需要交换机支持,不适合流量集中场景 |
| mode-3 | broadcast (广播模式) | 所有数据包都会通过每个接口发送一次 | 极高冗余性 | 带宽浪费严重,适用于特殊场景 |
| mode-4 | 802.3ad (LACP) | 基于 IEEE 802.3ad 标准动态链路聚合,实现带宽聚合 | 动态带宽聚合,高性能,高冗余 | 需要交换机支持 LACP,配置复杂 |
| mode-5 | balance-tlb (传输流量负载均衡) | 根据接口负载动态调整出站流量分配 | 出站负载均衡,不需交换机支持 | 入站流量无法负载均衡,适合出站流量大的场景 |
bond的配置
配置 bond 的方式多钟多样,包括 nmcli、命令操作以及配置文件的方式,这里我们通过配置文件的方式进行操作。
在配置之前,我们需要了解到操作系统支持的 bond 参数有哪些?首先我们可以查看下内核中关于 bond 的支持情况
1 | [root@node1 ~]# modinfo bonding |
实战配置
bond4
假设我们现在有两张网卡做 bond4,我们通过实战的形式来看一下如何做 bond:
假设我们有两张网卡 enp1s0f0 和 enp1s0f1,首先可以通ethtool 查看下网卡的信息,例如
1
2
3
4
5
6
7
8
9
10
11
12
13
14
15
16
17
18
19
20
21
22
[root@node1 ~]# ethtool enp1s0f0
Settings for enp1s0f0:
Supported ports: [ FIBRE ]
Supported link modes: xxxx
Supported pause frame use: Symmetric
Supports auto-negotiation: Yes
Supported FEC modes: None RS
Advertised link modes: xxxx
Advertised pause frame use: No
Advertised auto-negotiation: Yes
Advertised FEC modes: RS
Speed: 100000Mb/s
Duplex: Full
Port: FIBRE
PHYAD: 0
Transceiver: internal
Auto-negotiation: on
Supports Wake-on: d
Wake-on: d
Current message level: 0x00000004 (4)
link
Link detected: yes我们可以看到这张卡的配置是 100000Mb/s,也就是一张百 G 的网卡,做bond4 就是将两张百 G 的网卡绑定在一起形成一张200G 的卡
不同的操作系统网卡的配置方式存在不同,我们这里以 centos7为例,进入
/etc/sysconfig/network-scripts目录下,我们可以看到网卡的配置文件名称是ifcfg-网卡名的格式。创建 bond 文件
1
2
3
4
5
6
7
8
DEVICE=bond0
TYPE=bond
ONBOOT=yes
BOOTPROTO=none
USERCTL=no
BONDING_OPTS="mode=4 miimon=100 xmit_hash_policy=layer3+4"
IPADDR=192.168.11.10
NETMASK=255.255.255.0参数释义:
DEVICE=bond0:指定这个配置是用于名为bond0的设备,bond0是逻辑绑定的接口名。TYPE=bond:表明这个设备是一个 bond 接口。ONBOOT=yes:在系统启动时自动启动这个网络接口。BOOTPROTO=none: 不使用任何启动协议(如DHCP)来获取IP地址。这意味着IP地址将静态配置。USERCTL=no:不允许非root用户控制这个网络接口。BONDING_OPTS=”mode=4 miimon=100 xmit_hash_policy=layer3+4”:这是绑定接口的选项,这一项支持的参数详细类型可以通过上面的modinfo bonding查看,在上述示例中,具体包含:mode=4:指定绑定模式为模式4(802.3ad 动态链路聚合)。这种模式使用LACP(链路聚合控制协议)来自动协商链路聚合。miimon=100:链路监控间隔时间,单位为毫秒。这里设置为100ms,意味着系统每100毫秒检查一次链路状态。xmit_hash_policy=layer3+4:传输哈希策略,这里设置为基于第三层(IP地址)和第四层(TCP/UDP端口号)的哈希。这有助于在多个物理接口之间均匀分布流量。
IPADDR=192.168.11.10:为这个绑定接口静态配置的IP地址。NETMASK=255.255.255.0:子网掩码
- 创建被绑定网卡文件:参数释义:
1
2
3
4
5
6
7
8
9
10
11
12
13
14
15
16
[root@node1 network-scripts]# cat ifcfg-enp1s0f0
DEVICE=enp1s0f0
TYPE=Ethernet
ONBOOT=yes
BOOTPROTO=none
MASTER=bond0
SLAVE=yes
HOTPLUG=no
[root@node1 network-scripts]# cat ifcfg-enp1s0f1
DEVICE=enp1s0f1
TYPE=Ethernet
ONBOOT=yes
BOOTPROTO=none
MASTER=bond0
SLAVE=yes
HOTPLUG=no
DEVICE=enp1s0f1:指定这个配置是用于名为enp1s0f1的设备。enp1s0f1是物理网络接口的名称,遵循现代Linux的命名约定(基于硬件属性和位置)。TYPE=Ethernet:表明这个设备是一个以太网接口。ONBOOT=yes:在系统启动时自动启动这个网络接口。BOOTPROTO=none:不使用任何启动协议(如DHCP)来获取IP地址。这意味着这个接口将不会从DHCP服务器获取IP配置,而是可能需要静态配置(尽管作为绑定接口的从接口,它通常不会直接分配IP地址)。MASTER=bond0:指定这个接口的主接口(master interface)是bond0。这意味着enp1s0f1将作为bond0绑定接口的一个从接口。SLAVE=yes:表明这个接口是一个从接口(slave interface),它是绑定到MASTER指定的主接口上的。HOTPLUG=no:禁用热插拔功能。这通常用于确保在系统启动时或配置更改时,接口不会被自动激活或禁用,而是根据配置文件中的ONBOOT设置来管理。
- 配置完成后,重启网络:
1
systemctl restart network
- 检查网口可以看到 enp1s0f0 和 enp1s0f1 网卡的状态都是 slave,都以 bond0 为 master
1
2
3
4
5
[root@node1 network-scripts]# ip a | grep -E "bond0|enp1s0f0|enp1s0f1"
6: enp1s0f0: <BROADCAST,MULTICAST,SLAVE,UP,LOWER_UP> mtu 1500 qdisc mq master bond0 state UP group default qlen 1000
7: enp1s0f1: <BROADCAST,MULTICAST,SLAVE,UP,LOWER_UP> mtu 1500 qdisc mq master bond0 state UP group default qlen 1000
9: bond0: <BROADCAST,MULTICAST,MASTER,UP,LOWER_UP> mtu 1500 qdisc noqueue state UP group default qlen 1000
inet 192.168.11.11/24 brd 192.168.11.255 scope global noprefixroute bond0
bond 测试
在配置完 bond0 之后,我们可以看一下 bond0 的具体情况
1 | [root@node1 network-scripts]# ethtool bond0 |
这里的网卡速度变成了 200G,也就是聚合成功,如果显示的还是 100G,那么是有问题的,需要对配置进行检查,包括交换机侧是否已经开启支持该功能的配置。
详细的信息也可以通过以下方式查看:
1 | [root@node1 network-scripts]# cat /proc/net/bonding/bond0 |
性能测试
在网卡bond 做完之后,我们需要对性能进行测试,测试一下网卡的带宽是否能达到期望的要求,比较常用的测试工具有 iperf 和 netperf, 我们这里使用iperf:
1 | # 在服务器和客户端安装 iperf, 这里需要注意的是 iperf 有两个版本, iperf3 需要采用多服务器模式才可以打到性能要求,所以这里安装 iperf2 |
等完成后,观察测试结果:
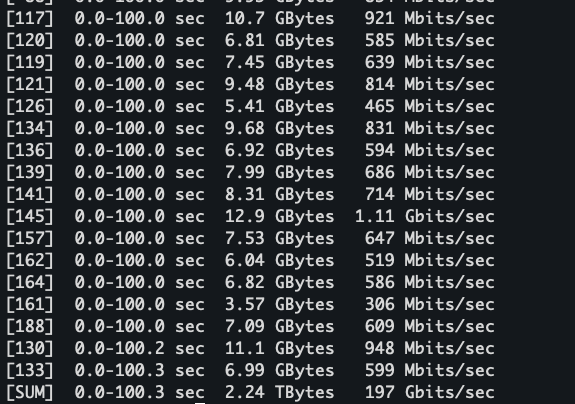
可以看到这里的网卡总带宽跑到了 197Gb/s,已经接近跑满。同时我们也可以观察下网卡的监控:
可以看到 bond 的流量均匀的打到了两个slave 网卡上。
性能调优
在网卡bond 完成之后,有的时候测试的性能可能并不理想,那么这个时候一般有以下方法进行调优,以 bond4 为例:
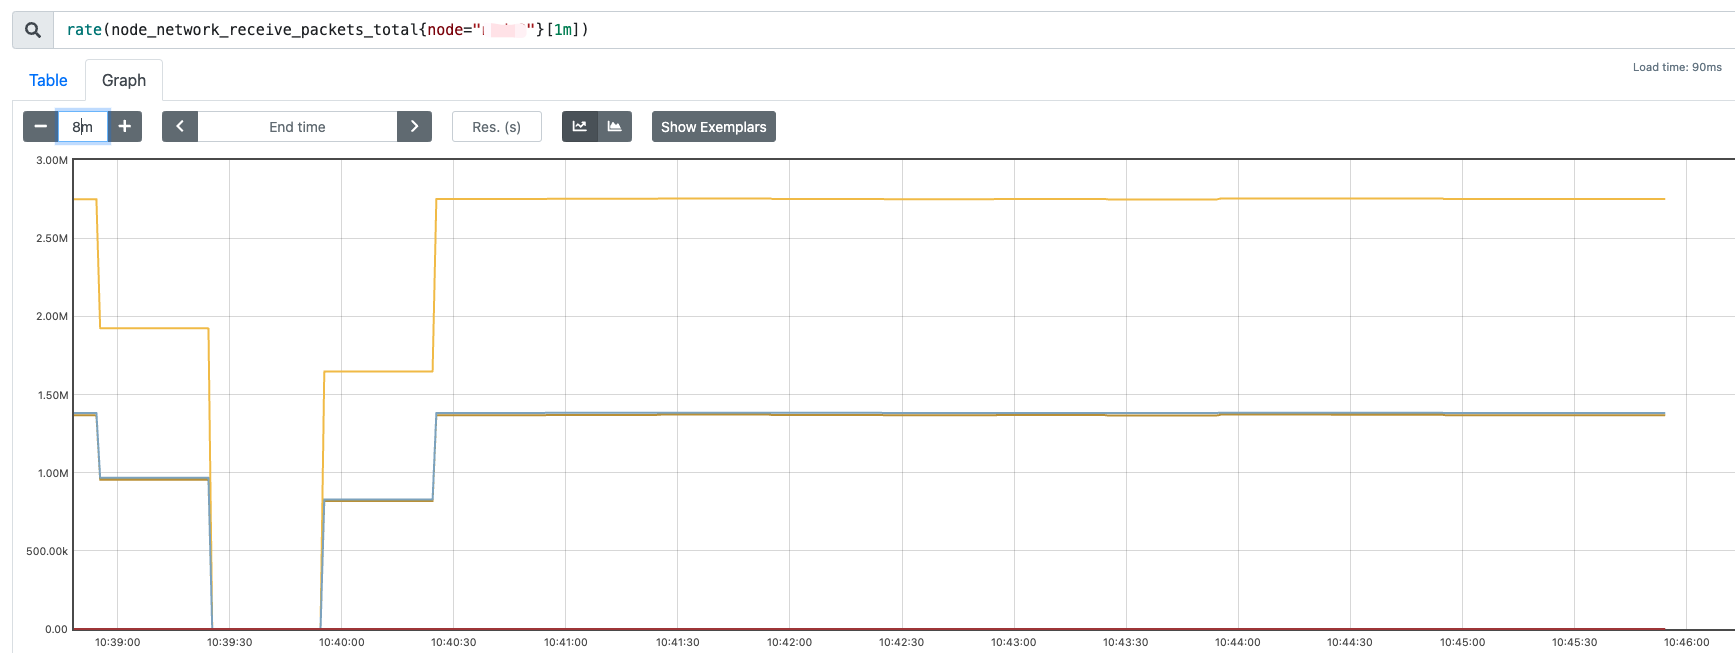
确保 slave 网卡均匀的接收到了流量
因为bond4 是动态聚合类型的,需要两张网卡都接收到流量,我们可以通过监控查看网卡的流量情况,以 prometheus 为例,可以通过以下指标查看:
1 | rate(node_network_receive_packets_total{node="xxx"}[1m]) |
启用 Jumbo Frames
启用 Jumbo Frames 是指将网卡的最大传输单元(MTU,Maximum Transmission Unit)增大到标准以太网帧(1500 字节)以上,通常设置为 9000 字节左右。Jumbo Frames 可以显著提高传输效率,减少 CPU 开销,在需要传输大量数据的场景中(如高性能计算和数据中心网络),启用 Jumbo Frames 能提升网络性能。
优势:
1. 减少数据包数量:由于每个数据包承载的数据更多,数据传输时需要的包数量会减少,进而减少网络和主机的负载。
2. 降低 CPU 开销:更少的数据包意味着更少的中断请求(IRQ),降低了 CPU 的处理压力,尤其在高吞吐量网络下效果更明显。
3. 提高吞吐量:在大数据传输的场景中,Jumbo Frames 可以有效增加带宽利用率。
操作步骤:
- 查看当前网卡的 mtu可以看到当前网卡的 mtu 是 1500
1
2
[root@node1 ~]# ip a show eth0
2: eth0: <BROADCAST,MULTICAST,UP,LOWER_UP> mtu 1500 qdisc mq state UP group default qlen 1000 - 设置 mtu 为 9000
1
2
3
ip link set dev <网卡名> mtu 9000
# 如果需要重启之后也保持,那么需要在配置文件中添加
MTU=9000
系统调优
- 调整 CPU 中断绑定: 如果两张网卡的中断处理都绑定在同一个 CPU 核心上,可能会导致性能瓶颈。可以使用 irqbalance 或手动调整中断的 CPU 绑定,将中断分布到多个 CPU 核心,以减少单核负载。
- 优化队列数量和大小:可以通过调整网卡的队列数量和大小,提高网卡的并行处理能力
1
ethtool -G enp133s0f1 rx 8192 tx 8192
- 调整网络栈参数:通过 /etc/sysctl.conf 文件进行 TCP 参数优化,例如增大 TCP 缓冲区,优化内核参数以支持高吞吐量:
1
2
3
4
5
# 增加 TCP 缓冲区大小
net.core.rmem_max = 16777216
net.core.wmem_max = 16777216
net.ipv4.tcp_rmem = 4096 87380 16777216
net.ipv4.tcp_wmem = 4096 65536 16777216
故障测试
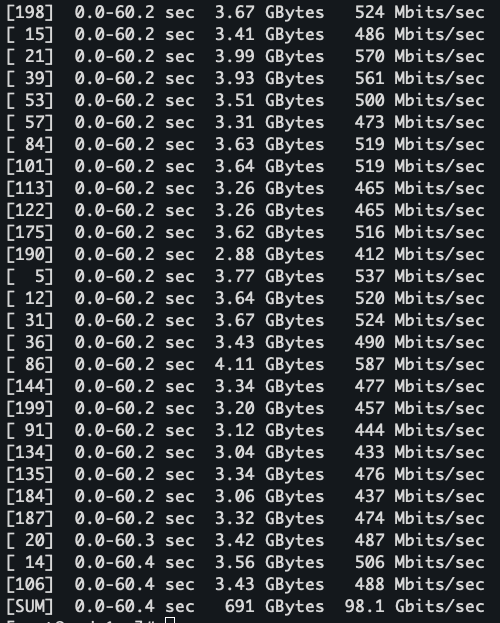
既然是双网卡做 bond,尝试关闭其中一个网卡进行测试:
1 | [root@node2 ~]# ifdown enp1s0f0 |
然后继续使用 iperf 进行测试,可以看到带宽只能跑到接近 100G
bond0 和 另外一张up 的网卡有流量并且曲线重合
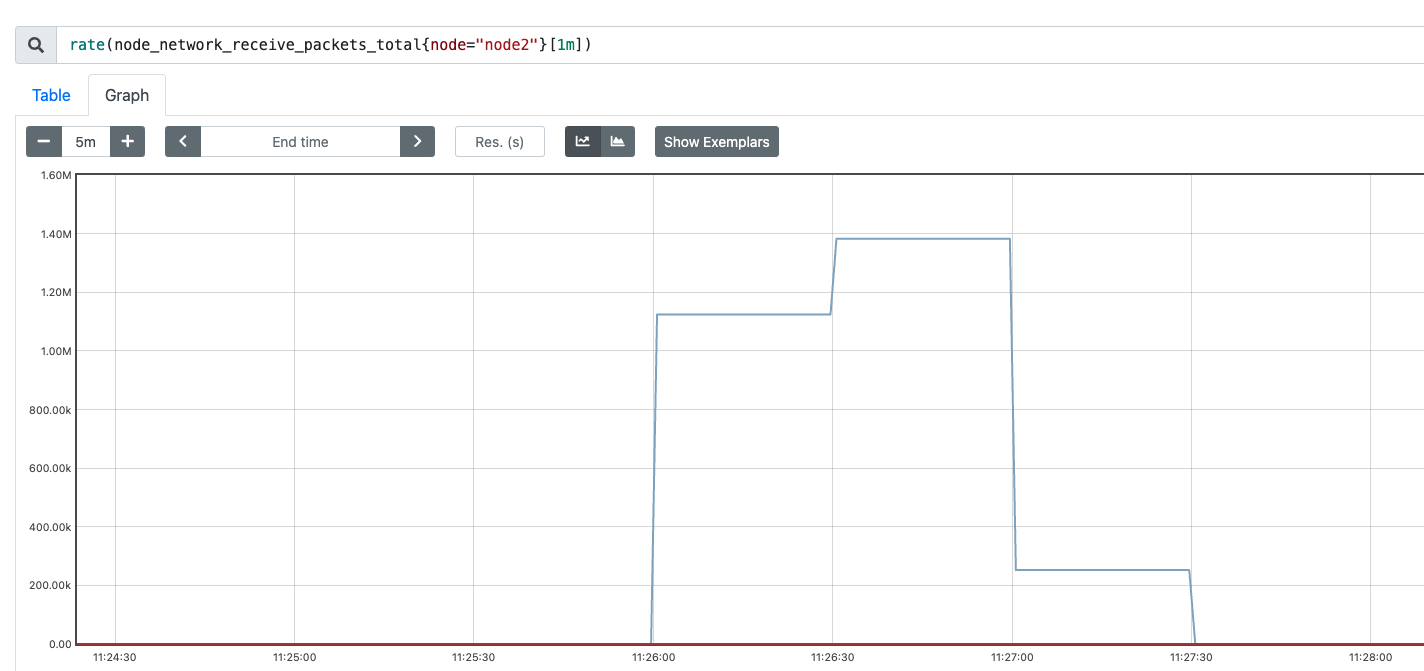
从结果来看符合预期
声明
此文章已经发布在个人博客上: baixiaozhou.github.io
码字不易,希望文章对各位读者朋友们有所帮助和启发,文章的撰写有的时候是根据自己的经验和遇到的一些场景所思考的,存在不足和错误的地方,希望读者朋友们指正
本文采用 署名-非商业性使用-相同方式共享 4.0 国际 许可协议,转载请注明出处。


